Sunday, January 20, 2008

grassy snow brioche - 2 color brioche finished!

This was my sister's Christmas present and I showed some swatches over the summer but never showed the finished object! I uploaded the pictures to flickr in October so I must have finished it around then also. As usual, I made a reversible scarf that won't roll.
IMG_4212 IMG_4210

While I was working on this scarf, I found a great brioche stitch resource which describes the common abbreviations, and several variations. Next time I'm ready for some brioche knitting, I'm definitely going there for inspiration.

needles: US 8 (5mm)
yarn: Knitpicks Andean Silk in leaf and cream, about 1.5 skeins of each - that's about 150 yards of two colors in worsted weight

details: I used the Italian tubular cast on to make 20 stitches in green.

On the first row, I did *knit1 green, slip1* 10 times (10*2=20).

On the second row, I did *knit1 white, slip1* 10 times.

I repeated these rows twice for a total of 4 rows.

Then I switched to the 2-color brioche maintaining the green side and white side. The scarf is 4.5 inches wide but stretchy. I made it about 80 inches long which is perfect for my sister to loop around her neck euro style. (I just spent 10 minutes looking for an example of a scarf worn euro style on the internet but came up dry - it's not the way I looped the scarf around the tree in the photo above). Okay - just found a picture of a scarf worn in what I am calling 'euro style'. It's the green scarf in the first picture in an old post of Annie Modesitt.

Here are my tips for staying sane with 2-color brioche copied from my previous post on brioche swatches:

1) switch colors every row (to figure out which color is next if I walk away, whichever column/rib has a knit stitch is the color I used last, the next color is the color of the knit stitches that have a yarnover on them)
2) slide the knitting to whichever side has the proper color working yarn (why double points or short circulars are excellent needle choices)
3) when necessary (on half the rows) purl the columns so they stay the right color and right stitch

Thursday, January 17, 2008

Oceanwind's Tweed Scarf: it's reversible!

I found a great pattern on ravelry right before Christmas and it was just in time to make my Dad a scarf. I prefer reversible scarves that won't roll and the combination of horizontal and vertical ribbing was perfect - scroll down to see the chart I used.


yarn: Knitpicks Memories 'smores' I used 2 50 gram skeins
needles: size 3 (3.25mm)
pattern: Lori Law's Tweed Scarf from Oceanwind Knits
details: I changed this a bit since I was using fingering weight yarn with a pattern written for bulky or chunky yarn. I cast on 30 stitches and made each 'block' of the pattern 10 stitches by 10 rows.

final dimensions: 4.25" wide unstretched or 6" wide stretched and about 80 inches long. My dad doesn't mind the narrowness of the scarf - he plans to wear it looped on itself. It covers his entire neck when looped and the tails are waist length.


I love that this scarf pattern is reversible and doesn't roll - here's the chart I used so you can make one too! I can't figure out how to upload a pdf to blogger but try right-clicking to save the image and then print it out.

Saturday, January 5, 2008

free pattern: reversible ribbed hat

Here's a pattern for the simple ribbed hat I made my husband for Christmas. One size will fit almost any adult because the ribbing is extra stretchy and it's easy to add stripes and make it look store bought.


yarn: Debbie Bliss merino aran, less than 2 50gram balls of the main color with a small amount of two contrasting color for the stripes
needles: size 6 (4mm) 16" circular and 6" double points - I used needles 2 sizes smaller than recommended since ribbing is generally worked with smaller needles
size: 20inches unstretched, stretches to fit heads up to 24 inches
gauge: 10 stitches = 1.75" unstretched in 2x2 ribbing

body of hat:
  1. cast on 100 stitches with the main color (I used the long-tail cast on)
  2. join in the round careful not to twist the stitches, mark the beginning of the round
  3. knit in 2x2 ribbing for 8 rows
  4. switch to a different color and knit 1 entire round (this makes the color change look neater on the right side)
  5. continuing with the new color, re-establish the 2x2 ribbing and knit 3 more rounds; there should be a total of 4 rounds in the new color
  6. switch back to the main color and knit 1 entire round, then re-establish the 2x2 ribbing and knit 5 more rounds for a total of 6 rounds of the main color
  7. switch to the second contrasting color, knit 1 round, re-establish 2x2 ribbing for 3 additional rounds for a total of 4 rounds in the second stripe
  8. switch back to the main color and knit 1 round, change to 2x2 ribbing and work until hat fits comfortably on the head (about 8 inches)
crown decreases: place a marker at the beginning of the round, the first two stitches should be knits, switch to double pointed needles when necessary - between round 5 and 7

repeat stitches between * and * until the end of the round, numbered instructions are for each round:

  1. *knit 2, purl2together, knit 2, purl 2*, there should be 87 stitches at the end of the round
  2. *knit 2, purl 1, knit 2, purl 2*
  3. *knit 2, purl 1, knit 2, purl 2*
  4. *knit 2, purl 1, knit 2, purl2together*, there should be 75 stitches at the end of the round
  5. *knit 2, purl 1* there should still be 75 stitches per round
  6. *knit 2, purl 1* there should still be 75 stitches per round
  7. *knit 2, knit a purl and knit together, knit 1*, [50 stitches at end of round]
  8. knit entire round
  9. *knit 2 together, knit 3* [40 stitches at end of round]
  10. *knit 2, knit 2 together* [30 stitches at end of round]
  11. *knit 2 together, knit 1* [20 stitches at end of round]
  12. *knit 2 together* [10 stitches at end of round]
  13. *knit 2 together* [5 stitches remain]
(note that decreases are staggered for the crown so there won't be any obvious decrease lines - if you like the decrease lines, just line them up!)

Cut or break the yarn leaving a tail at least 10 " long, thread a darning needle and draw the tail through the remaining 5 stitches to secure them. Weave in ends and enjoy!

The hat was a bit itchy after extended wear (hours) so I washed it with some shampoo and conditioner - it's much softer now. I really enjoyed working with the
Debbie Bliss merino aran yarn - it worked up beautifully on smaller needles than called for and has a nice tight twist which made it easy to knit without looking. I can tell this yarn will hold up wonderfully. With the wide array of colors, this might be my new favorite worsted weight yarn!

Wednesday, November 28, 2007

fabulous fetching

Where has the time gone? I got lost in the time vortex of school and holidays. Here is the lastest addition to Christmas knitting! Fetching with half fingers:


Pattern: Fetching (but I modified it some)
Yarn: Knitpicks Merino Style (slightly more than one 50 gram ball per pair)
Needles: size 5 (3.75mm) 5" dpns
Modifications: With the yarn change and the small hands of the recipients, I knit these with 40 stitches and I added the fingers using the instructions in Ann Budd's pattern book. I cast off the fingers when they reached my knuckle (guessing my hands are about the same length as the recipients' ;-).

The white mittens have a braided cable pattern that's probably in a stitch dictionary somewhere but I fiddled it out at a knitting guild meeting (Candace Eisner Strick was talking that night - it was a special treat to sit and knit and fondle her designs - she even bicycles every morning :-) Wish I was dedicated enough to bike every morning. So for the braided cable mittens, I cast on 40 stitches but ribbed in a K3 P1 pattern (instead of the K4 P1 used in the Fetching pattern). Here's the cable pattern:

round 1 *P1, K3*, repeat until end of round
round 2 *P1 C2L K1*, repeat until end of round
round 3 *P1 K1 C2R*, repeat until end of round

repeat rounds 2 and 3 until the cabling is tall enough (for the cuff, I did 5 repeats so I had 5 cables crossing left and 5 crossing right over 10 rounds)

C2L and C2R are standard abbreviations but confused me a bunch when I first saw them. The C means 'cable' the 2 is the number of stitches involved and the L or R means which direction the top stitch crosses the bottom stitch.
C2L means the first stitch is crossed left in front of the second stitch
C2R means the second stitch is crossed right in front of the first stitch or the first stitch is crossed left in back of the second stitch

So C4L (found in the fetching pattern as C4F) means that 4 stitches are manipulated but 2 are crossed left in front of the other 2 which cross right in back. I like to take deep breaths when I read cable patterns - I think charts are definitely the way to go when it gets more complicated.

And I'm so behind that I haven't shown my one Thanksgiving picture. I got to spend it with my husbands' family (sadly I forgot to get my camera out of my bag) and my family. My mom decorated the tables beautifully - here's a picture of one of them


Until next time...school, the Tobey dog, Christmas knitting, and the dining room table project are calling

Can you see Tobey's paws crossed over one another? I could watch him sleep all day.


I originally posted this entry on stringtheories.wordpress.com

Sunday, October 21, 2007

rhiannon's braided cable hat - a free pattern

I wanted to make something special with the fabulous silk/merino yarn I got at the fingerlakes fiber festival. I didn't have enough yarn for anything big so I made a hat which is perfect with the supersoft yarn; the braided cable is a variant of one I found in one of the Harmony guides I borrowed from my guild.


yarn: Steam Valley Hand Dyed Silk Yarn, the hat weighs 53 grams which is slightly more than half the skein
needles: size 8 (16" and dpns)
gauge: 4.25 stitches and 6.5 rows per inch in stockinette

Pattern - I'm new to pattern writing so please let me know if this is easy to understand and if it turns out how I describe.

First I made the headband with an i-cord edging and braided cable. Then I grafted the edges of the headband together and made sure it fit over my head. Next, I calculated gauge in stockinette and measured the circumference of the headband to figure out how many stitches to pick up for the body of the hat. I picked up stitches from the top of the headband and knit in stockinette until it was time for the crown decreases. Since the theme here is braids and braids are usually done with 3 strands, I made the decreases at even thirds with 3 purl stitches between each set of decreases.

headband: provisionally cast on 15 stitches. The braided cable is over 6 stitches, there are 3 purl stitches on either side of the cable, and there are 3 i-cord stitches on the right hand side if you're looking at the right side of the knitting. The idea is:

(RS) PPP KKKKKK PPP KKK
(WS) KKK
PPPPPP KKK sl3

I usually slip purlwise so the loops are correctly oriented for untwisted knitting on the next row but do whatever you need to keep the i-cord stitches untwisted. Also, make sure you carry a lot of slack for the i-cord - if it's too tight, it won't fit over your head. My i-cord is slightly tighter than the rest of the headband which helps the hat fit snugly but comfortably.

In purple, are the stitches for the braided cable. Cabling will only happen on RS rows and I used the no-cable needle method - I'm linking to the tutorial Grumperina wrote because it's the one I learned from but there are many many tutorials available.

cable pattern:

row 1: K6
row 2: P6
row 3: C4L K2 (the first 2 stitches cross left in front, the 3rd and 4th cross right in back, knit the last 2 plain)
row 4: P6
row 5: K6
row 6: P6
row 7: K2 C4R (knit the first 2 stitches plain, the 3rd and 4th cross left in back and the 5th and 6th cross right in front)
row 8: P6

Work the headband with the 6 stitch, 8 row cable pattern and i-cord edging until it goes around your head. Mine measured 23.5 inches when it was slightly stretched. If you can, try to end after row 8 of the cable pattern so when grafted, the braid is uninterrupted. Graft all the stitches together as they come in reverse stockinette, stockinette, or i-cord. For the i-cord, I grafted on the knit side and wove the end into the center so the i-cord curled around.

calculate number of stitches to pick up: try on the headband where you plan to wear the hat and measure the circumference at the i-cord. Mine was 23.5 inches and my gauge was 4.25 stitches per inch.

23.5 * 4.25 ~ 100 stitches

I placed markers at 4 equal intervals and picked up 25 stitches between each marker on the opposite side than the i-cord (this is the left side on my little chart above).

body: now that your stitches are picked up, knit in the round until you are ready for crown decreases (about 2.75 inches of stockinette or 4.75 inches from the i-cord edge). I always make my hats on 16" circulars and without removing the needles try it on often - I know it's time for crown decreases when the hat is long enough to cover my ears and the stitches don't fall off the needle at the top of my head.

crown decreases: I decreased 6 stitches per row by decreasing 2 stitches every row at 3 places.

Place 3 markers evenly to mark the decreases. (between markers, there will be 33, 33, and 34 stitches - I don't worry about the one extra stitch - it gets an extra decrease on the almost last row)
row 1: [K26, K2tog, P3, SSK] repeat 3 times until end of round.
At this point I usually ditch the markers since the purl stitches scream *decrease* at me.
row 2: [K24, K2tog, P3, SSK] 3 times
continue decreasing in the same places every row until there are 15 stitches left (they should be PPP KK in each of the 3 sections)
last row: [P3tog, sl1 k1 psso] 3 times, there will be 6 stitches left - break yarn, thread a darning needle and run the yarn through remaining stitches twice, weave in ends.

If anyone makes this - comment with a link to a picture so I can see what they all look like.

I originally posted this entry and pattern on my other blog stringtheories.wordpress.com

Saturday, September 29, 2007

licorice twist sweater - a seamless shrug

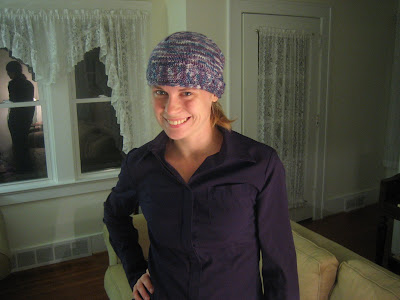
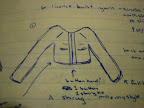
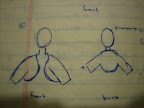
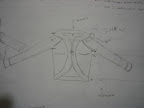
I finished the shrug! (click on the link for some of the background of the yarn and how I got started with the pattern.) It's more like a sweater now because it is actually long enough to reach my waist and I love it! I can't believe how closely the finished product matches my sketches and imaginings of how I wanted it to end up. The first two drawings are ones I made during a meeting at work, the 3rd is the schematic I used to design the pattern and make the sweater.

I actually finished the sweater nearly two weeks ago, uploaded the pictures last week, and found my sketches tonight....yay for being organized - they were unexpectedly in the very bag I'd used for this project and right where I'd left them under a gigantic pile of laundry.


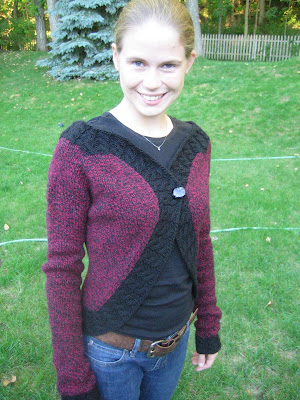
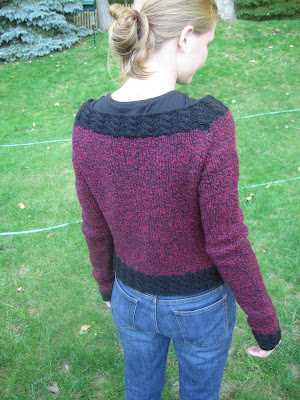
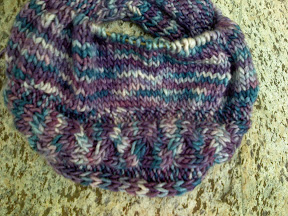
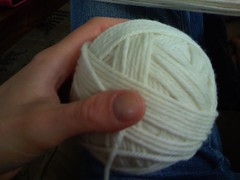
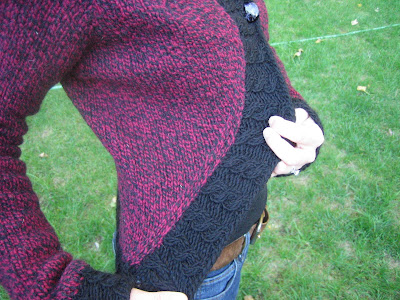
yarn: 1) I started with 497 grams of the licorice twist (I made up this name - I have no idea what the original colorway was called) from Briggs and Little Woolen Mills and have 192 grams left. 2) I used an entire skein of Lamb's Pride Worsted which is 113 grams and 173 meters for the black border. Funnily enough, while I have quite a bit of the licorice twist left, I had about a yard of the black left when I cast of the ~450 stitch main border....I was weighing the skein every row to figure out how wide I'd be able to make the border.

needles: Addi Turbo size 10 (6mm) 32" and some size 10 (6mm) 8" dpns. It was quite interesting to make the approximately 60" border on 32" needles. I scrunched all the stitches together and did some cursing as I lifted the entire sweater around and around and slid the stitches down the right side and up the left side. I did acquire some cheap size 10 plastic needles about halfway through but they were also 32" so each row, I alternated which needles I was using to make at least half the stitches easier to knit.

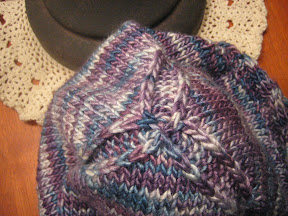
button: I got the button at the Fingerlakes fiber festival and it is perfect for the sweater. I made the button hole in the border by casting off 2 stitches and casting them on the next row. It stretched out a lot until I whip stitched around the hole with the same yarn to strengthen it.

Things I learned making this sweater:

1) the raglan construction doesn't look so nice with a different color border knitted on - maybe I can make a yoke next time so it doesn't look so square where the black border is knitted into the raglans.

2) When I think I'm going to run out of yarn and buy more, I will not actually run out of yarn.

3) The power of the scale is awesome - for the border I was using about 6 grams of yarn per plain round about about 7 per cabled round. When I had 45 grams left, I figured I could knit 6 more rows and still have enough for the bind off. It actually worked. The bind off used almost two rows worth of yarn which I will certainly keep in mind next time.

4) I never used to understand why anyone would make pieces of a garment flat, then sew them together - it seemed like an extra step and kinda confused me. When I look at a sleeve knitted flat, it doesn't look like it will go on my arm - when I'm knitting a sleeve in the round, I can try it on as I go. When I'm knitting seamless, I have almost no ends to weave in, and fewer stitches to pick up since I also used figure 8 cast-ons everywhere. Somehow, I derive extra pleasure from not having any seams in the garment. I began to understand why someone might knit a garment flat when I was working on the sleeves - every 3 or 4 rounds, I'd have to pick the whole sweater up and untwist it. It was still nice not having to pin the sleeve in place and sew it to the shoulder wondering if I was doing it right or if I'd have to try again and again...

5) this is the worst - I'm ALLERGIC to mohair. I had no idea. It didn't bother me when I swatched, it didn't bother me when I was carrying the mohair around to look at it, it didn't bother me when I knit the cuffs. It began to bother me about halfway through the border (the same time I was panicking about running out of yarn and obsessively weighing the remaining skein). I actually had to stop knitting, wash my hands, wash my face, take out my contacts, and swallow some claritin. Then I finished knitting after I took a walk. I wore it to work the next day because it was almost cold and I was excited about my new sweater. I had to take it off on 3 or 4 separate occasions because my eyes were too itchy. I've washed it, but I think I'm still allergic - either my eyes are itching thinking about it, or they're itching because I moved it to make room for clean laundry a little bit ago.

I can't quite face re-knitting the border just yet, I like it too much to give it away to someone my size with no mohair allergy, and I don't really see the point of owning a sweater that lives unworn in my attic.

I want to destroy the 15% mohair in the border. I love the border. It's perfect. I can't believe I figured out the right number of stitches to pick up for each separate section of the sweater, I can't believe I counted to 450, and I can't believe my border lies flat on the first try. Maybe when it gets really cold, I can take a lot of claritin, avoid touching my eyes, and wear it anyway.

The shrug that morphed into a sweater was in fact a success. I'm planning to make one for my sister - she's smaller than me so I think I can get the entire sweater and border from her 4 skeins of Briggs and Little wool.

I've never really written a pattern before - I take notes for myself to make something again later but that's about it. I'm pretty sure my notes wouldn't make sense to anyone but me and of course, they're only in my size. However, if enough (more than 10) people are interested in a seamless sweater/shrug and leave a comment telling me so, I'd consider doing some math and writing it up for a few sizes.

happy knitting!

I originally posted this on my other blog stringtheories.wordpress.com

Sunday, August 19, 2007

Skeins aren't scary - how I handwind a ball

I first encountered skeined yarn when I was about 6 and I was helping my mom wind it up so she could make me a sweater. Let's just say I still have that yarn - probably in the original balls and it is finally becoming a shrug of sorts. I used to succumb to temptation and unwind the entire skein at once into a tidy pile on the floor or couch - then without pausing I could wind the entire ball. Except, the tidy pile on the floor never remains tidy! Either the dog walks in, a child walks in, my husband moves the yarn to sit on the couch, or the yarn is just so happy to be free that it tangles itself when I take my eyes off it for an instant to work on the ball.

I don't have a swift or a ballwinder. They would certainly make winding balls faster but whenever I see the price of a swift or ballwinder, I think about how much yarn I could get instead. Once I spent an hour winding 50 grams (440 yards) of laceweight into a ball but I was watching tv in the dark so I couldn't have been knitting anyway. 50 grams of worsted weight usually takes me about 15-20 minutes to ball up. Normally I watch tv or chat when I'm winding balls and think about the project I'm going to make with the yarn.

To wind a skein into a ball, find a comfortable place to sit with knees up (couch or bed for me) and settle down for a few minutes. (Some people use the back of a chair but I like adjusting my knees to the perfect size for the skein - I also find it tricky to keep the strands from either sliding down on the chair or slipping off the top). Once I've started unwinding the skein and wrapping the free yarn into a ball, I don't like to move until all the yarn is secured in the ball.

1) Take the skein out of the package and unroll it without tangling the strands - it should resemble a large donut. Place the skein over the knees - adjust knees so the skein isn't stretched and isn't loose. The skein will be tied in at least two places. Untie the scrap yarn holding the skein together. One of the ties should also be attached to the two ends of the skein. Pick the end that is on the 'outside' of the skein so that the yarn unwraps easily from the skein.

IMG_0026

2) Carefully disentangle 2-5 wraps of yarn from the skein - it is okay to pile these in your lap or nearby because this is a short enough piece of yarn that it doesn't usually tangle. If it does tangle, it's maybe 3 yards of yarn so it's easy to disentangle. Find the end and start the ball.

IMG_0027
3) Holding the ball in one hand, use the other hand to pull 2-5 more wraps off the skein and lay the yarn down next to you. Wrap the loose yarn onto the ball. Repeat 3 until there is no more yarn on the skein.

IMG_0020
I have wrapped a lot of badly behaved balls of yarn. I've learned a few things since I was 6.

1) Don't yank on the yarn when wrapping the ball - loose is better. I gently lay each strand of yarn on the ball as I'm wrapping.

2) Only wrap 6-10 strands in the same place - make sure it is the 'equator' of the ball so it stays on well. Turn the ball as necessary so the 'equator' moves around and the ball grows evenly. I tried to make an illustration showing the order of wrapping and illustrating the directional changes. First I wrapped the red section, then the blue section, then the peach, then the green. I generally try and wrap in 6 different directions before 'repeating' - the repeating though is always shifted slightly so that the new yarn is wrapping in the 'valleys' left by the old yarn.

ballwinding_2

3) when changing directions, I place my thumb on the yarn and make sure I wrap over any places the yarn loosens so the ball can't fall apart from the inside. The arrow is pointing to my thumb where I'm holding the yarn in place. I start wrapping with 2 and then 3 and 4 are supposed to wrap over the loose yarn where my thumb was and make everything snug.

ballwinding_1IMG_0028

How do you wind yarn? I can't be the only person without a swift and ballwinder can I?

28 Aug 07 edit: And the very same week that I wrote about ball-winding, Kelley Petkun of Knitpicks talked about ballwinding (including swifts and winders) in her podcast!