Sunday, January 20, 2008

grassy snow brioche - 2 color brioche finished!

This was my sister's Christmas present and I showed some swatches over the summer but never showed the finished object! I uploaded the pictures to flickr in October so I must have finished it around then also. As usual, I made a reversible scarf that won't roll.
IMG_4212 IMG_4210

While I was working on this scarf, I found a great brioche stitch resource which describes the common abbreviations, and several variations. Next time I'm ready for some brioche knitting, I'm definitely going there for inspiration.

needles: US 8 (5mm)
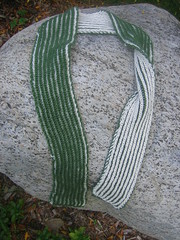
yarn: Knitpicks Andean Silk in leaf and cream, about 1.5 skeins of each - that's about 150 yards of two colors in worsted weight

details: I used the Italian tubular cast on to make 20 stitches in green.

On the first row, I did *knit1 green, slip1* 10 times (10*2=20).

On the second row, I did *knit1 white, slip1* 10 times.

I repeated these rows twice for a total of 4 rows.

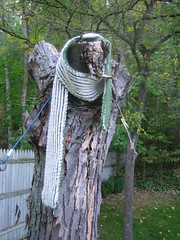
Then I switched to the 2-color brioche maintaining the green side and white side. The scarf is 4.5 inches wide but stretchy. I made it about 80 inches long which is perfect for my sister to loop around her neck euro style. (I just spent 10 minutes looking for an example of a scarf worn euro style on the internet but came up dry - it's not the way I looped the scarf around the tree in the photo above). Okay - just found a picture of a scarf worn in what I am calling 'euro style'. It's the green scarf in the first picture in an old post of Annie Modesitt.

Here are my tips for staying sane with 2-color brioche copied from my previous post on brioche swatches:

1) switch colors every row (to figure out which color is next if I walk away, whichever column/rib has a knit stitch is the color I used last, the next color is the color of the knit stitches that have a yarnover on them)
2) slide the knitting to whichever side has the proper color working yarn (why double points or short circulars are excellent needle choices)
3) when necessary (on half the rows) purl the columns so they stay the right color and right stitch

Thursday, January 17, 2008

Oceanwind's Tweed Scarf: it's reversible!

I found a great pattern on ravelry right before Christmas and it was just in time to make my Dad a scarf. I prefer reversible scarves that won't roll and the combination of horizontal and vertical ribbing was perfect - scroll down to see the chart I used.


yarn: Knitpicks Memories 'smores' I used 2 50 gram skeins
needles: size 3 (3.25mm)
pattern: Lori Law's Tweed Scarf from Oceanwind Knits
details: I changed this a bit since I was using fingering weight yarn with a pattern written for bulky or chunky yarn. I cast on 30 stitches and made each 'block' of the pattern 10 stitches by 10 rows.

final dimensions: 4.25" wide unstretched or 6" wide stretched and about 80 inches long. My dad doesn't mind the narrowness of the scarf - he plans to wear it looped on itself. It covers his entire neck when looped and the tails are waist length.


I love that this scarf pattern is reversible and doesn't roll - here's the chart I used so you can make one too! I can't figure out how to upload a pdf to blogger but try right-clicking to save the image and then print it out.

Saturday, January 5, 2008

free pattern: reversible ribbed hat

Here's a pattern for the simple ribbed hat I made my husband for Christmas. One size will fit almost any adult because the ribbing is extra stretchy and it's easy to add stripes and make it look store bought.


yarn: Debbie Bliss merino aran, less than 2 50gram balls of the main color with a small amount of two contrasting color for the stripes
needles: size 6 (4mm) 16" circular and 6" double points - I used needles 2 sizes smaller than recommended since ribbing is generally worked with smaller needles
size: 20inches unstretched, stretches to fit heads up to 24 inches
gauge: 10 stitches = 1.75" unstretched in 2x2 ribbing

body of hat:
  1. cast on 100 stitches with the main color (I used the long-tail cast on)
  2. join in the round careful not to twist the stitches, mark the beginning of the round
  3. knit in 2x2 ribbing for 8 rows
  4. switch to a different color and knit 1 entire round (this makes the color change look neater on the right side)
  5. continuing with the new color, re-establish the 2x2 ribbing and knit 3 more rounds; there should be a total of 4 rounds in the new color
  6. switch back to the main color and knit 1 entire round, then re-establish the 2x2 ribbing and knit 5 more rounds for a total of 6 rounds of the main color
  7. switch to the second contrasting color, knit 1 round, re-establish 2x2 ribbing for 3 additional rounds for a total of 4 rounds in the second stripe
  8. switch back to the main color and knit 1 round, change to 2x2 ribbing and work until hat fits comfortably on the head (about 8 inches)
crown decreases: place a marker at the beginning of the round, the first two stitches should be knits, switch to double pointed needles when necessary - between round 5 and 7

repeat stitches between * and * until the end of the round, numbered instructions are for each round:

  1. *knit 2, purl2together, knit 2, purl 2*, there should be 87 stitches at the end of the round
  2. *knit 2, purl 1, knit 2, purl 2*
  3. *knit 2, purl 1, knit 2, purl 2*
  4. *knit 2, purl 1, knit 2, purl2together*, there should be 75 stitches at the end of the round
  5. *knit 2, purl 1* there should still be 75 stitches per round
  6. *knit 2, purl 1* there should still be 75 stitches per round
  7. *knit 2, knit a purl and knit together, knit 1*, [50 stitches at end of round]
  8. knit entire round
  9. *knit 2 together, knit 3* [40 stitches at end of round]
  10. *knit 2, knit 2 together* [30 stitches at end of round]
  11. *knit 2 together, knit 1* [20 stitches at end of round]
  12. *knit 2 together* [10 stitches at end of round]
  13. *knit 2 together* [5 stitches remain]
(note that decreases are staggered for the crown so there won't be any obvious decrease lines - if you like the decrease lines, just line them up!)

Cut or break the yarn leaving a tail at least 10 " long, thread a darning needle and draw the tail through the remaining 5 stitches to secure them. Weave in ends and enjoy!

The hat was a bit itchy after extended wear (hours) so I washed it with some shampoo and conditioner - it's much softer now. I really enjoyed working with the
Debbie Bliss merino aran yarn - it worked up beautifully on smaller needles than called for and has a nice tight twist which made it easy to knit without looking. I can tell this yarn will hold up wonderfully. With the wide array of colors, this might be my new favorite worsted weight yarn!